Tuesday, June 29, 2010

Earthy inspiration

Finally finished something from a workshop I took with Julie Picarello last year. Yes, last year! You are probably thinking that is a long time and it is, but some times I can't come up with how to finish something and have mentally moved on. This pendant required adding a clay tube in the back to carry the wire.
The workshop was my first from a professional polymer clay jewelry artist and it was fun and informative. Thanks Julie. You are a great teacher


Sunday, June 20, 2010

Black and White continued

After making all the black and white beads for the swap (oh, there are more, but I won't bore you with those), there were leftover canes that I thought might look good as pendants. The first one is bold and geometric as you see below.


This one has a finer, linear design. Different strokes for different folks.


Friday, June 11, 2010

Goldilocks and the three...

Remember Goldilocks? Yeah, the picky little girl that goes into a strange house and has the nerve to complain about the food. This porridge is too hot and this porridge is too cold. yada yada yada. Well, I had a bit of sympathy for the kid when I tried out a couple ideas for the recent guild bead swap, Black and White Beads.


This one is too big, this one too gray, and this one too busy! Will I ever get anything "just right". NO, but there must be something closer to "just right" then these. Keep going and something will resonate right?


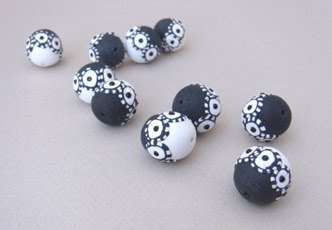
This half and half design was what I decided to make. It looked reasonably straightforward until I dropped a couple on the floor and the itty bitty black beads in the middle popped out. A coat of liquid polymer and hopefully they were good to go. Due to the uneven number of participants in the swap, I ended up making another set of 10 beads like the original bead, (above left), but smaller.


Here are 17 of the 18 total beads. You can see they fell into two general types. Those with flowers or fine intricate designs...


...and these, with more geometric and bold designs. I love 'em all. What a creative guild we have!
Hope you enjoy them too and are inspired to create some for yourself.

Thursday, June 3, 2010

Bubbles and more Bubbles

Playing around with circle cutters during Lindly's workshop was a lot of fun. Space bubbles come to mind.
You can see the basic unbaked bubble clay in the photo below. Good composition was the biggest challenge in the final pieces.


Here are some pendants and earrings made with more bubble clay.


Below you can see how I used left overs to personalize a blade keeper.


Friday, May 28, 2010

Lindly Haunani Workshop

Finally got some of the pieces finished from all the clay I prepared in Lindly's workshop. Lindly, is such a knowledgeable teacher especially in the area of color mixing. I appreciate her generous spirit and easy going nature.


We conditioned and prepared lots of clay.
Here are some of the pendants I finally finished.


Friday, May 21, 2010

For The Birds

I wanted to make a present for a friend to celebrate her beautiful new home. After visiting her place I had an idea. She has a collection of beautiful bird houses and I decided to make her an addition to the group. I used a wood base and covered it with textured polymer clay sheets and cane slices. It was tedious at first, but lots of fun. If my friend prefers, she can put it in her beautiful garden and maybe some sweet little birds will make it their home.
I might even make one for my little ninjas (what I call the hummingbirds at my house). You could make one too. Just keep in mind that if you intend it for outdoors, you need to put a coat or two of varnish on the outside to protect it from the weather. The colors may fade over time, but that should be minimal.

Friday, April 30, 2010

Recycled Floppy Bracelets

Do you still have some old floppy disks floating around? If you do, you could have some fun making jewelry with the recycled parts. I took apart some floppy disks we finally decided to toss and saved the metal tops and the round disks found in the middle. I wasn't sure how I'd use them, but knew that sometime I would make either jewelry or sculpture with them. Isn't that what a typical pack rat artist would say? Meanwhile I needed to recondition a LOT of old polymer clay for the Lindly Hanani workshop coming to my guild. The recycled scrap clay looked so beautiful, (doesn't it always) that I had to divert from the conditioning task and make a couple bracelets to celebrate Earth Day. Here are the basics.

Taking apart the floppy is easy. The challenge comes when you try to drill holes in each metal disk to attach them together. I would recommend a very small drill bit, 1/16 or finer. You could also put wire through the center hole to the back and string them together that way.


Roll out the clay on the pasta machine at the thickest setting. Cut with a circle cutter about the same size as the disk or a little smaller. You can always flatten it out to fit. Push the clay into the metal disks. Bake. After the disks are cool, remove the clay, and spread some glue on the back side.


Reposition the clay on the metal disk and let dry. Add jump rings to connect the disks together and add a clasp. You can see I used magnets for one, and wire for the other. Have fun!